Shiro介绍
跟SpringSecurity一样,它也是一个鉴权授权项目,属于Apache开源的一个轻量级框架,没用SpringSecurity复杂。
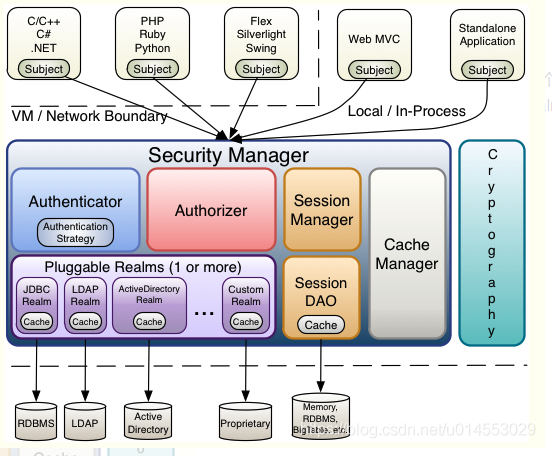
Shiro架构图:

Subject:与应用交互的主体,例如用户,第三方应用等。
SecurityManager:shiro的核心,负责整合所有的组件,使他们能够方便快捷完成某项功能。例如:身份验证,权限验证等。
Authenticator:认证器,负责主体认证的,这是一个扩展点,如果用户觉得Shiro默认的不好,可以自定义实现;其需要认证策略(Authentication Strategy),即什么情况下算用户认证通过了。
Authorizer:决定主体是否有权限进行相应的操作;即控制着用户能访问应用中的哪些功能。
SessionManager:会话管理。
SessionDAO:数据访问对象,对session进行CRUD。
CacheManager:缓存管理器。创建和管理缓存,为 authentication, authorization 和 session management 提供缓存数据,避免直接访问数据库,提高效率。
Cryptography;密码模块,提供加密组件。
Realms:可以有1个或多个Realm,可以认为是安全实体数据源,即用于获取安全实体的;可以是JDBC实现,也可以是LDAP实现,或者内存实现等等;由用户提 供;注意:Shiro不知道你的用户/权限存储在哪及以何种格式存储;所以我们一般在应用中都需要实现自己的Realm。
SpringBoot整合Shiro
1.导入Shiro
有两种方式
其一:使用普通Shiro包
<dependency>
    <groupId>org.apache.shiro</groupId>
    <artifactId>shiro-spring-boot-web-starter</artifactId>
    <version>1.7.1</version>
</dependency>
其二:使用Starter包导入(本文使用),两者相比较,无法就是简化了一些代码,使用差别基本没用
<dependency>
    <groupId>org.apache.shiro</groupId>
    <artifactId>shiro-spring-boot-web-starter</artifactId>
    <version>1.7.1</version>
</dependency>
2.自定义Realm
//自定义的Realm需要继承AuthorizingRealm
public class CustomRealm extends AuthorizingRealm {

    @Autowired
    private UserService userService;

    //告诉shiro如何根据获取到的用户信息中的密码和盐值来校验密码
    //说白了,就是Shiro会加密用户登录的密码然后和数据库的密码进行比较
    //这个有很多实现类,这里只演示这种
    {
        //设置用于匹配密码的CredentialsMatcher
        HashedCredentialsMatcher hashMatcher = new HashedCredentialsMatcher();
        hashMatcher.setHashAlgorithmName("MD5");
        hashMatcher.setHashIterations(1024);
        this.setCredentialsMatcher(hashMatcher);//将CredentialsMatcher添加进Realm
    }

    //定义如何获取用户的角色和权限的逻辑,给shiro做权限判断
    @Override
    protected AuthorizationInfo doGetAuthorizationInfo(PrincipalCollection principals) {
        System.out.println("执行了授权操作");
        if (principals == null) {
            throw new AuthorizationException("PrincipalCollection 方法参数不能为 null。");
        }

        User user = (User) getAvailablePrincipal(principals);
        //或(User) SecurityUtils.getSubject().getPrincipal()//这个可以在很多地方用不局限于这里

        SimpleAuthorizationInfo info = new SimpleAuthorizationInfo();

        //https://shiro.apache.org/java-authorization-guide.html
        //Shiro中权限分为Role和perms
        info.addStringPermission(user.getPerms());//写入用户权限,这里权限直接写在了User表中

        return info;
    }

    //定义如何获取用户信息的业务逻辑,给shiro做登录
    @Override
    protected AuthenticationInfo doGetAuthenticationInfo(AuthenticationToken token) throws AuthenticationException {
        System.out.println("执行了认证操作");
        UsernamePasswordToken upToken = (UsernamePasswordToken) token;
        String username = upToken.getUsername();

        // 空用户名无效
        if (username == null) {
            throw new AccountException("不允许空用户名。");
        }

        //在数据库中根据username获取用户
        User userDB = userService.findUserByName(username);


        if (userDB == null) {
            throw new UnknownAccountException("找不到帐户[" + username + "]");
        }

        //将用户写入 由Shiro进行比对 这里的密码是加密后的
        SimpleAuthenticationInfo info = new SimpleAuthenticationInfo(userDB, userDB.getPassword(), ByteSource.Util.bytes(userDB.getSalt()), getName());
        return info;
    }

}
3.配置Shiro
@Configuration
public class ShiroConfig {

    //将自己自定义的Realm写入容器
    @Bean
    CustomRealm customRealm() {
        return new CustomRealm();
    }

    //安全管理器
    @Bean
    DefaultWebSecurityManager securityManager() {
        DefaultWebSecurityManager manager = new DefaultWebSecurityManager();
        manager.setRealm(customRealm());
        return manager;
    }

    //这里就是配置路径访问权限的,也可以通过注解
    @Bean
    public ShiroFilterChainDefinition shiroFilterChainDefinition() {
        DefaultShiroFilterChainDefinition chainDefinition = new DefaultShiroFilterChainDefinition();

        // 具有user:admin权限登录
        chainDefinition.addPathDefinition("/admin/**", "authc, perms[user:admin]");//roles[admin]

        // 所有人皆可以访问
        chainDefinition.addPathDefinition("/**", "anon");
        return chainDefinition;
    }
}

注解做控制:

|          注解           |                 功能                 |
| :---------------------: | :----------------------------------: |
|     @RequiresGuest      |           只有游客可以访问           |
| @RequiresAuthentication |           需要登录才能访问           |
|      @RequiresUser      |  已登录的用户或“记住我”的用户能访问  |
|     @RequiresRoles      | 已登录的用户需具有指定的角色才能访问 |
|  @RequiresPermissions   | 已登录的用户需具有指定的权限才能访问 |

只用url配置控制鉴权授权:

| 配置缩写          | 对应的过滤器                   | 功能                                                         |
| ----------------- | ------------------------------ | ------------------------------------------------------------ |
| anon              | AnonymousFilter                | 指定url可以匿名访问                                          |
| authc             | FormAuthenticationFilter       | 指定url需要form表单登录,默认会从请求中获取`username`、`password`,`rememberMe`等参数并尝试登录,如果登录不了就会跳转到loginUrl配置的路径。我们也可以用这个过滤器做默认的登录逻辑,但是一般都是我们自己在控制器写登录逻辑的,自己写的话出错返回的信息都可以定制嘛。 |
| authcBasic        | BasicHttpAuthenticationFilter  | 指定url需要basic登录                                         |
| logout            | LogoutFilter                   | 登出过滤器,配置指定url就可以实现退出功能,非常方便          |
| noSessionCreation | NoSessionCreationFilter        | 禁止创建会话                                                 |
| perms             | PermissionsAuthorizationFilter | 需要指定权限才能访问                                         |
| port              | PortFilter                     | 需要指定端口才能访问                                         |
| rest              | HttpMethodPermissionFilter     | 将http请求方法转化成相应的动词来构造一个权限字符串,这个感觉意义不大,有兴趣自己看源码的注释 |
| roles             | RolesAuthorizationFilter       | 需要指定角色才能访问                                         |
| ssl               | SslFilter                      | 需要https请求才能访问                                        |
| user              | UserFilter                     | 需要已登录或“记住我”的用户才能访问                           |

使用两者结合是最好的。

### 4.YML配置

```yaml
shiro:
  unauthorizedUrl: /403
  successUrl: /index
  loginUrl: /login
参考
官网:https://shiro.apache.org/spring-boot.html#web-applications
文章1:https://programmer.ink/think/simple-authentication-example-with-spring-boot-2-shiro.html
文章2:https://segmentfault.com/a/1190000014479154
文章3:https://blog.csdn.net/u014553029/article/details/106579537/
文章5:https://blog.csdn.net/pengjunlee/article/details/95600843
文章6:https://blog.csdn.net/u011478348/article/details/104123407